Anyone who knows me, knows I love to cook. Furthermore, I love to experiment with cooking and try new things. It was to no one’s surprise, therefore, that this summer I decided to attempt a traditional pit BBQ. Not just your typical brick fire pit with a rack over it, mind you. No, I wanted to go beyond tradition. I’m talking downright primitive, back to the caveman days. My pit bbq would be a literal pit, in the ground. Oh and did I mention, I was going to bury the food?
Pit BBQ, Going Back in Time
Pit BBQ’s, also known as earth ovens, ground ovens, or cooking pits, have been around for at least 300,000 years. This cooking method is one of, if not the oldest and most widespread across all the civilizations of the world. In many places this is still a common way to cook large amounts of food. While pit BBQ in North America today has typically evolved to mean above-ground firebox and oven styles, there are still some classic examples of the more traditional techniques. Hawaiian Luau is one well known example, in which a whole pig is cooked in an earth oven.

Considering I love history, BBQ, and trying new cooking styles, it was an easy choice to start digging a pit. These sorts of things are best shared with others, of course, so I scheduled a weekend and invited people over. The reactions people had when I explained that I would be cooking their food in a hole in the ground were priceless. This is something you really just don’t see or hear about around here.
With a date set and a group invited, I now had some work to do.
Preparation, Time to Dig
The plan was pretty simple, dig a hole, fill it with fire, start cooking. Pretty straight forward, really. After all, there is a reason this is one of the first and longest lasting methods of cooking known to man. I decided on a pit just slightly smaller than a standard 4′ x 8′ sheet of plywood. While I was going to fill it back in after the party, it occurred to me while digging that I could simply cover it with plywood and re-use it again for future events.

Digging the hole was obviously the hardest part of this whole experiment. We have sandy soil generally, but the location I chose to dig had a layer of limestone gravel about a foot down. After an hour or two of pickaxing and shoveling I had a hole about 3 feet deep. A couple more hours with the chainsaw and I had a good stack of firewood piled up in the hole plus extra to throw in after.

Got the Pit, What to Cook?
While I was setting the date, inviting people, and getting the pit BBQ set up, I was thinking about what to cook in it. Your options for an earth oven are wide open. Pretty much anything that you would cook in an oven, slow cooker, or on a grill can work. Certain cuts of meat, however, lend themselves better to this sort of thing than others. Eventually I settled on a whole pork shoulder. Pork shoulder is a fatty, tougher cut of the pig that breaks down nicely when slow cooked. Once cooked, I would pull it and serve pulled pork on a bun to my guests. A great backyard meal for around the bonfire.
I picked up my meat from the local butcher, mixed up a beer brine of my own creation, and set it aside to soak for a few days.

Six Steps to Perfect Pork, the Actual Cooking Process
By the morning of the day before my party, I had everything prepared that I needed. My meat had soaked in the brine for 2 days, and sat covered in a dry rub for another day. My pit was stacked with wood and I had plenty of extra. All the extra materials I would need had been purchased and were ready to go, and most importantly, I had a supply of whisky and the whole day free to do this right. With the sun shining down, whisky in hand, I followed these 6 steps to cook the pork shoulder:
Fire
- Lit the firewood up. This step took approximately 4-5 hours for the size of hole and amount of wood I had. As the initial pile burned down I added more wood to the fire. The goal here is to end up with a bed of coals approximately 1.5 foot deep. Use dry, hard woods such as oak, maple, ash, etc. Be sure that you do not use soft, sappy woods such as pine, spruce, fir, or etc. as these can give off some nasty byproducts when they burn. Your choice of wood can affect the flavor of your meat to a degree, although it is much less noticeable in this style of cooking since there is little smoke. I focused more on generating good solid coals that would provide a consistent heat rather than worrying about particular flavors of smoke.

Wrap
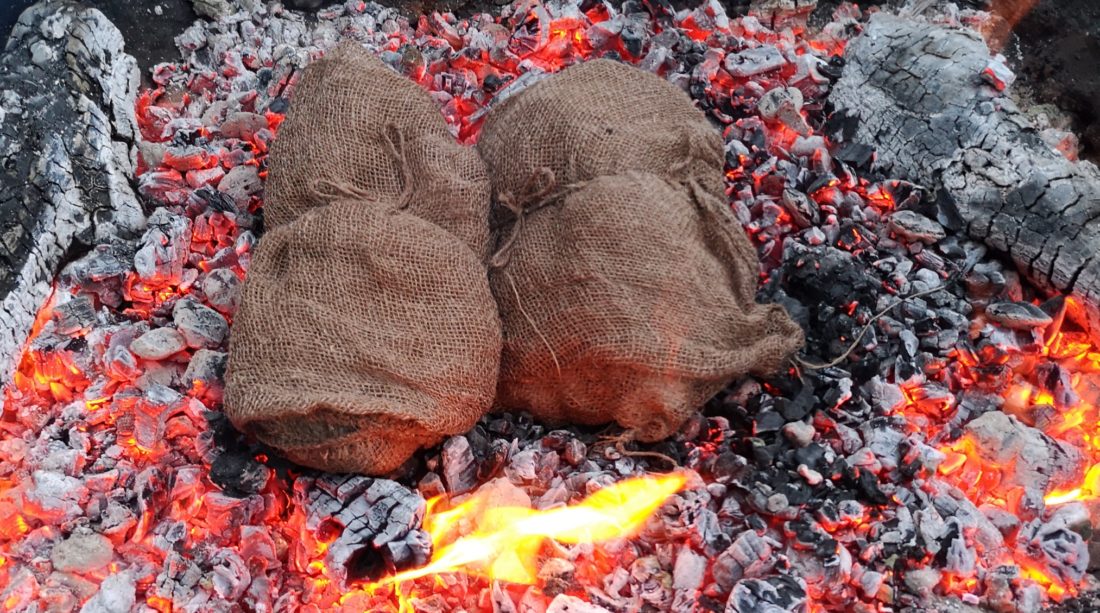
- Once I had a bed of coals ready, I prepared the meat. For this step I wrapped the pork shoulder snugly in parchment paper. Next I wrapped it with a layer of wet newspaper, and finally into a wet burlap bag. I wrapped the wet burlap bag around it snugly and tied it up so it wouldn’t open up while handling it. The burlap should be soaked through, I had mine dunked in a pail for around 10 minutes. This layer of wet burlap is what protects your meat from just being burnt up by the hot coals. The layers of paper help to keep the moisture inside the package with the meat. I had to be careful not to make the layer of newspaper too thick, however, since the meat does need to get hot enough to cook. In fact, on my next attempt I will be trying this with an extra layer of parchment paper and leaving the newspaper out completely.

Place
- After wrapping, I put the meat package directly onto the coals. With a rake I pulled the coals up and around the meat for better coverage. The heat from these coals is what cooks the meat slowly through the night, which is why it is important to have a good thick bed of them established.

Bury
- Once everything was placed on the coals, I laid my sheet of plywood over top of the pit. Using the dirt I had shoveled out to make the pit, I covered the plywood over completely. By far the most critical step here is making sure that the pit is sealed completely. If you can see smoke escaping, then you need more dirt. Pit BBQ slow cooking works by suffocating the flames and forcing the coals to burn incredibly slowly. This way, the heat is retained for much longer. Quite often, when you dig up your food later, you will experience the coals flaring up into flames as the new air and oxygen rushes into the hole.

Wait
- Wait. Just wait. Have a drink. Wait some more. Trust me, the hardest thing about pit BBQ is the waiting. You absolutely must resist the urge to check on your food. Opening the hole to take a peek will ruin the balance that you worked so hard to achieve. I buried my food on a Saturday evening and set my timer for 16 hours. Sunday afternoon I dug it up, as much as I was tempted to check it throughout the night. Have faith, watch for escaping smoke and seal it up if you find some. This is about all you can do at this point.
Dig
- Sunday afternoon, it was time to dig that sucker up! Going to work with the shovel, the plywood was cleared off and removed quickly. My pork shoulder was waiting for me, the burlap hardly even singed. I had some foil pans ready to put the meat in and I took it inside to cool a bit. A little while later I had the rubber gloves on and was pulling it apart into a steamy, mouthwatering mess.

Taste Test, the Moment We’ve Been Waiting For
Naturally, people lined up ready to dig into the pulled pork before I was even finished laying out plates. The smell was amazing and the pork stayed incredibly juicy and tender. Home made finishing sauce on top, a side of baked beans, and plenty of cold beer, the meal was a definite hit. Everyone did enjoy the novelty of eating food that had been buried underground all night. I enjoyed the connection to a more primitive time, as well as the experience of using a technique that transcends time, place, and culture.

The experiment with a pit BBQ was a huge success. This is a method of cooking that I really enjoyed, although it is a fair bit of work to prepare. I expect that I will try and do similar events a couple times per summer, with different foods each time. In the meantime, I learned a lot about traditional BBQ, learned some new recipes, and shared a great meal with a group of friends. There is really not much more a guy can ask for.


3blinking
gay chat washington https://bjsgaychatroom.info/
dating dominant gay men https://gaypridee.com/
gay chat phone lines https://gaytgpost.com/
free gay and bi mens chat https://gay-buddies.com/
gossip slots tournament https://2-free-slots.com/
hot shot slots https://freeonlneslotmachine.com/
scatter slots characters https://candylandslotmachine.com/
casino slots free games https://pennyslotmachines.org/
multiclass spell slots 5e https://slotmachinesworld.com/
clearwater slots https://slotmachinesforum.net/
house of fun free slots https://slot-machine-sale.com/
slim slots https://beat-slot-machines.com/
loosest slots san diego https://download-slot-machines.com/
best online slots https://411slotmachine.com/
grand win casino slots https://www-slotmachines.com/
free slots to play https://slotmachinegameinfo.com/
mba dissertation help india https://buydissertationhelp.com/
finance dissertation writing help https://dissertationwriting-service.com/
top dissertation help https://help-with-dissertations.com/
dissertation express https://mydissertationwritinghelp.com/
acknowledgements dissertation https://dissertations-writing.org/
dissertation problem statement https://helpon-doctoral-dissertations.net/